- Real Estate

Pre-trip / Post-trip Vehicle Inspection Form
- Car Maintenance
- Vehicle Inspection Form
- Pre-trip/Post-trip Vehicle Inspection Form
The Pre-trip/Post-trip Vehicle Inspection Form is used to ensure that a vehicle is in proper working condition before and after a trip. It is designed to identify any potential issues or defects that could affect the vehicle's safety or performance.
The pre-trip/post-trip vehicle inspection form is typically filed by the driver of the vehicle.
Q: What is a pre-trip/post-trip vehicle inspection form? A: It is a form used to inspect a vehicle before and after a trip.
Q: Why is a pre-trip/post-trip vehicle inspection form necessary? A: It helps ensure the vehicle is in safe and working condition.
Q: What should be checked during a pre-trip vehicle inspection? A: Fluid levels, tires, lights, brakes, and other key components should be checked.
Q: What should be checked during a post-trip vehicle inspection? A: Any damage, issues, or changes in the vehicle's condition should be noted.
Q: Who should complete a pre-trip/post-trip vehicle inspection form? A: Anyone driving a vehicle, especially commercial drivers, should complete this form.
Q: Is a pre-trip/post-trip vehicle inspection form required by law? A: It may be required for commercial vehicles , but it is a good practice for all drivers.
Q: How often should a pre-trip/post-trip vehicle inspection be done? A: It should be done before and after each trip, or as specified by company or regulatory requirements .
Download Pre-trip / Post-trip Vehicle Inspection Form
Linked topics.
Related Documents
- Pre/Post-trip Vehicle Inspection Sheet
- Colony Specialty Automobile Vehicle Inspection Form
- Daily Pre Trip Inspection Form for Bobcat
- Vacation Request Form
- Child Travel Consent Form
- Field Trip Consent Form
- Used Vehicle Inspection Checklist Template
- Your Visa Signature Card Guide to Benefits: Wells Fargo Visa Signature Credit Card
- Sample Mortgage Pre-approval Letter
- Pre-employment Application Form for New Employees Template
- Pre-visit Nutrition Assessment Form
- Pre-kindergarten General Assessment Form
- Pre-kindergarten Scissor Skills Assessment Form
- Pre-kindergarten Report Card Template
- Wennersten's Algebra I Pre-ap Slope Intercept Form Worksheet
- Pre-employment Physical Examination Form
- Self-identification Form for Veteran Status (Pre-employment Offer)
- Italian Application for Schengen Visa - Embassy of Italy
- Application Form for Bulgarian Visa - Embassy of Bulgaria, Washington D.c.
- Convert Word to PDF
- Convert Excel to PDF
- Convert PNG to PDF
- Convert GIF to PDF
- Convert TIFF to PDF
- Convert PowerPoint to PDF
- Convert JPG to PDF
- Convert PDF to JPG
- Convert PDF to PNG
- Convert PDF to GIF
- Convert PDF to TIFF
- Compress PDF
- Rearrange PDF Pages
- Make PDF Searchable
- Privacy Policy
- Terms Of Service
Legal Disclaimer: The information provided on TemplateRoller.com is for general and educational purposes only and is not a substitute for professional advice. All information is provided in good faith, however, we make no representation or warranty of any kind regarding its accuracy, validity, reliability, or completeness. Consult with the appropriate professionals before taking any legal action. TemplateRoller.com will not be liable for loss or damage of any kind incurred as a result of using the information provided on the site.
- Mobile Forms
- FEATURED INTEGRATIONS
- See more Integrations
- See more CRM Integrations

- See more Storage Integrations
- See more Payment Integrations

- See more Email Integrations
- See 100+ integrations
- Jotform Teams
- Enterprise Mobile
- Prefill Forms
- HIPAA Forms
- Secure Forms
- Assign Forms
- Online Payments
- See more features
- Multiple Users
- Admin Console
- White Labeling
- See more Enterprise Features
- Contact Sales
- Contact Support
- Help Center
- Jotform Books
- Jotform Academy
Get a dedicated support team with Jotform Enterprise.
- Sign Up for Free
Driver PrePost Trip Inspection Form
A driver pre/post trip inspection form is used by truck drivers to track the condition of their vehicles.
- Business Forms
- Checklist Forms
- Inspection Forms
Vehicle Inspection Forms
- Driver Forms
A driver pre/post trip inspection form is used by truck drivers to track the condition of their vehicles. A pre/post trip inspection form is used before and after long journeys. Use this free online form to keep your vehicles in top condition and ensure the safety of your passengers. Whether you’re a truck driver or a business owner, Jotform can help you track your vehicles’ health and streamline your paperwork.
Just customize the form using our free Form Builder App to fit the way you want to run your vehicle maintenance — then share it with a link or embed on your website to start getting submissions. With our form builder and 100+ integrations, you can export submissions to Google Sheets, Dropbox, Box, and more — and if you’d like to learn more about how to use the form, you can review our tutorial!

Daily Vehicle Inspection Form
A daily vehicle inspection form is a document used by service workers to inspect vehicles on a daily basis. Whether you’re a police officer, a building inspector, or a worker for a large fleet, use this free Daily Vehicle Inspection Form to make sure your vehicles are up to code — and your team is working safely! Just customize the questions and add your logo and colors to make it your own.With Jotform’s free Mobile Forms app, you can collect vehicle inspection reports from any device. You can even customize your form to send feedback to your other accounts! If you’d like to automate data collection further, get more out of your forms with our free Form Builder — add the information you need, get PDFs emailed to you, and sync submissions to your favorite apps. You can even use Jotform Tables or Jotform Report Builder to analyze your inspections and see your work in a different light. Keep your team and vehicles safe and on task with a free Daily Vehicle Inspection Form.

Multi Point Vehicle Inspection Form
A Multi-Point Vehicle Inspection form is a document used to check the operating condition of a vehicle. Use this free Multi-Point Vehicle Inspection Form to check the condition of a vehicle before purchasing or renting it. Just customize it to fit the needs of your business, and send it out with a link, or an email, or download it on the go with our mobile app. This online vehicle inspection form is perfect for car dealers, rental companies, and car salespeople.Don’t want to use this form as-is? No problem! Just use our free Form Builder to add your logo, customize the form fields, add widgets and integrations, and change the fonts, colors, and layout of your Multi-Point Vehicle Inspection Form to make it your own. If you’d like to collect submissions in your other accounts — such as Google Drive, Dropbox, Box, or email — you can do it automatically with Jotform’s 100+ app integrations. And if you’d like to collect payments as well as signatures from your clients, integrate with a payment processor like Stripe, PayPal, or Square. Download it on any device, pull in submissions, and view them in the app — or share them directly to your email and share them with your team.

Truck Inspection Checklist
A truck inspection checklist is a document used by inspectors to record the details of a vehicle, especially the condition of its tires, brakes, lights, mirrors, fluids, fuel, or other mechanical components. The truck Inspection Checklist is for the assigned personnel to provide regular reports of their assigned tasks and the overall situation of the trucks. If you repair, inspect, or sell vehicles, use this Truck Inspection Checklist template to keep track of what needs to be done. Just download the form template, create a free Jotform account, and start adding your own specifications for trucks, buses, or RVs!With the Jotform app, you can capture photos, convert form submissions into PDFs, and even upload your own logo to the template. This Truck Inspection Checklist template even integrates with 100+ partner apps, so you can store responses in your favorite services, including Google Drive, Dropbox, Box, Google Sheets, and more! You can even print submitted forms in one click or download them in PDF format when you’re done.

Pre Delivery Inspection Form
A pre delivery inspection form includes a list of items to check out before accepting delivery of a new vehicle. Use this free Pre Delivery Inspection Form to guide the delivery staff through a new vehicle inspection. Simply customize the form to your specific needs, share it with the delivery company, and inspect the vehicle in person — or remotely via your phone, tablet, or computer. It’s ideal for new car sales and rentals — streamlining your process and making you more efficient.Want to make this inspection form match your needs? Add your logo, change the background image, or add more form fields to get every detail. Integrate with other apps to automatically sync submissions to Google Drive, Dropbox, and more. If you’d like to collect this information in-person, use our mobile app for iOS or Android to get a visit from the delivery staff whenever you need one. Walk through every corner of your new vehicle with Jotform’s free Pre Delivery Inspection Form.

Vehicle Appraisal Form
A vehicle appraisal form helps assess how much a vehicle is worth by giving a dealership a better idea of the vehicle’s condition. Use a free Vehicle Appraisal Form template to fill that need for your car dealership or others in your industry. Just enter your branding, customize the fields to the system you have in place, and deploy it for your customers to fill out.You could even customize it for individual people or customer groups. This vehicle appraisal form is ideal for dealerships to streamline the used car buying process and get feedback on how they're doing. By embedding this vehicle appraisal form on your website, you can also offer this form to your customers so they can fill it out at their convenience. This helps you get more accurate information from your customers and ultimately close more deals. Our secure online form will help you keep the customer experience personal and private.

Vehicle Valuation Form
A vehicle valuation form is a form that is used by insurance companies to determine the worth of a damaged vehicle that is not going to be salvaged. An online vehicle valuation form collects information about a vehicle regarding its condition, features, and extent of the damage.That is, it is similar to a car insurance estimate form, but differs from it in purpose. A vehicle insurance estimate form is used by the insurer to estimate the amount of compensation that is to be paid to the policyholder, in case of a claim. On the other hand, an online vehicle valuation form is used by an insurance adjuster to determine the worth of a vehicle that is either not going to be repaired or a salvageable vehicle.

Weekly Vehicle Inspection Form
Perform weekly police vehicle inspections for your precinct with this free online Vehicle Inspection Form. Easy to customize and fill out on any device.
A daily vehicle inspection form is a document used by service workers to inspect vehicles on a daily basis.
A Multi-Point Vehicle Inspection form is a document used to check the operating condition of a vehicle. Use this free Multi-Point Vehicle Inspection Form to check the condition of a vehicle before purchasing or renting it.
A Truck Inspection Checklist is a form template designed to help inspectors, vehicle experts, vehicle repairmen, and vehicle sellers in logging the latest situation of trucks and inspecting the details of the vehicle, especially the condition of its tires, brakes, lights, mirrors, fluids, fuel, or other mechanical components

A pre delivery inspection form includes a list of items to check out before accepting delivery of a new vehicle. Simply customize the form to your specific needs. No coding!
A vehicle appraisal form helps assess how much a used vehicle is worth by giving a dealership a better idea of the vehicle’s condition. Streamline the used car buying process with Jotform!

Boat Inspection Checklist Form
A boat inspection checklist form is a tool used by vehicle mechanics and technicians to identify defects in a boat’s engine and other components. Use this template to make the process easier. No coding!
A vehicle valuation form is a form that is used by insurance companies to determine the worth of a damaged vehicle which is not going to be salvaged.

Monthly Vehicle Inspection Form
A vehicle inspection form is a document that is used by a client or customer of a business or company to present their vehicle upon request. The purpose of the inspection form is to document the condition of the vehicle upon request.

Bus Inspection Form
A bus inspection form is used by transportation companies such as bus and coach companies, school buses, school districts, and transit authorities to record information about the inspection and maintenance of their fleet.

Heavy Equipment Checklist
A heavy equipment checklist is used to determine the condition of a machine used in construction.

Box Truck Inspection Form
A box truck inspection form is used by moving companies to inspect a box truck before its rental. It is easy to get your business organized with this free form. No coding.

Lyft Inspection Form
A Lyft inspection form is a document used by Lyft or Uber to ensure that their cars meet their requirements and are safe for the road.

Golf Cart Daily Inspection Form
A golf cart daily inspection form is used to check the mechanical condition of a golf cart. Customize without coding!

Car Show Judging Form
A car show judging form is a questionnaire used by car show judges to rate cars during a car show. Use our free Form Builder to make the Car Show Judging Form your own. Add colors, fonts, logos, and images to the documents.

Excavator Operator Evaluation Form
An excavator operator evaluation form is used by construction companies to ensure their employees are keeping up with best practices.

Pickup Truck Inspection Form
A pickup truck inspection form is a document used to record the details of a vehicle inspection. Customize this template without coding!

Straight Truck Pre Trip Inspection Form
A Straight Truck Pre-Trip Inspection Form is a form template designed to ensure safe transportation by identifying and minimizing potential risks

90 Day Dot Equipment Inspection
90 Day equipment inspection form

Excavation Safety Checklist
An excavation safety checklist is a list of safety concerns and precautions required by contractors when working on a construction site.

Crane Inspection Checklist
A crane inspection checklist is used in the field of construction to check the crane for safety.

Van Maintenance Checklist
A van maintenance checklist is a document that helps van owners keep track of the routine maintenance requirements of a van. Boost your progress via Jotform.

School Bus Cleaning Checklist Form
A school bus cleaning checklist is a document that allows school administrators and transportation departments to ensure that their buses are completely cleaned after trips to avoid potential risks to students, such as the spread of infections and the accumulation of dust
About Vehicle Inspection Forms Agents
A vehicle inspection form is used by any business that utilizes company vehicles requiring routine safety inspections. Whether you run a trucking company, a warehouse, or a golf course, you can find a ready form for any occasion, or build your own. Our forms can be filled out on any device, so mechanics and technicians can perform inspections on-site from their smartphones or tablets. Once a report is submitted, they are instantly available in your secure Jotform account, so you can keep everything together in one convenient location.
Customize these vehicle inspection forms to meet your business's individual needs with Jotform’s drag and drop form builder. No coding necessary — with just a few clicks you can add form elements, edit text fields and checklist items, include e-signature forms for inspectors to sign after completing an inspection, and even upload your own branding. Share your form by sending email invites or the form link and start collecting inspection reports right away. Go paperless and streamline your company’s vehicle inspection process with these fully-customizable Vehicle Inspection Forms from Jotform.

August 23, 2024 : The Ultimate Guide to Pre-and Post-Trip Inspections
For Trucks & Commercial Vehicles
I’m going to tell you something you already know: safety and compliance are non-negotiable in your industry. Truck trip inspections are not just routine—they’re essential. Mandated by the Department of Transportation (DOT) and Federal Motor Carrier Safety Administration (FMCSA) in the United States and the Canadian Council of Motor Transport Administrators (CCMTA) in Canada, these inspections are designed to catch potential issues before they could lead to breakdowns, fines, or worse—accidents on the road.
Whether you’re a safety manager or a worker responsible for ensuring the job site vehicles are in safe operating condition, your role is crucial in preventing accidents and maintaining regulatory compliance. One of the key responsibilities in this process is conducting thorough truck inspections and preparing a driver vehicle inspection report (DVIR)—before and after every journey.
In this comprehensive guide, I’ll walk you through everything you need to know about pre- and post- trip inspections and DVIRs, from understanding the legal requirements to implementing best practices that make the inspection process and document management more efficient and reliable.
Read on or skip ahead to one of these sections:
What is a Truck Trip Inspection Are Pre- and Post-Trip Inspections a Requirement? What is a Driver Vehicle Inspection Report (DVIR)? Who is Responsible for Conducting Inspections? How Long Do Pre- and Post-Trip Inspections Take? Key Elements of a Pre-Trip Inspection 5 Best Practices for Trip Inspections Top 10 Defects Found During Pre- and Post-Trip Inspections Fines for Violating Trip Inspection and DVIR Requirements
What is a Truck Trip Inspection?
Pre- and post-trip inspections are checks performed before and after the vehicle hits the road. The primary goal of truck trip inspections is to prevent accidents and breakdowns, which can lead to costly delays, fines, injuries, or worse.
A thorough inspection covers these parts and accessories as a minimum: Brakes, steering mechanism, lighting devices and reflectors, tires, horn, windshield wipers, mirrors, coupling devices, wheels and rims, and emergency equipment.
Are Pre- and Post-Trip Inspections a Requirement?
While pre- and post-trip inspections are essential for identifying potential safety hazards, they are also mandatory to ensure compliance with regulatory standards set by the Federal Motor Carrier Safety Administration (FMCSA) in the United States and the Canadian Council of Motor Transport Administrators (CCMTA) in Canada.
- United States: Code of Federal Regulations (CFR) 396.11 & CFR 396.13
- Canada: National Safety Code (NSC) Standard 13
The CCMTA has strict regulations that require documented inspections. Failing to conduct these inspections—or failing to produce the necessary documentation—can result in hefty fines, legal liabilities, and even the suspension of your vehicle’s operation. Trip inspections must be produced upon demand, and be no more than 24 hours old.
The FMCSA requires that the inspections be carried out, but documentation (in the form of a DVIR) is only required if a safety-related defect is found . However, documenting the inspection process and retaining proof is a highly recommended practice ( and required if crossing the northern border into Canada ).

What is a Driver Vehicle Inspection Report (DVIR)?
The DVIR is a formal document where the results of the vehicle inspections are recorded. It serves as a record that the inspection was completed and identifies any issues found during the inspection.
The DVIR is about documentation and compliance. It ensures there is a record of the vehicle’s condition, helps track maintenance needs, and provides evidence that the company is complying with regulatory requirements. There are also rules around retention of the original documents— 3 months from the date of the initial report for the FMCSA and 6 months for the CCMTA.
As stated in the previous section, a DVIR is only required in the US if the driver is aware of a safety-related defect. Canadian carriers operating in the US may elect to follow either the US or Canadian regulations around reporting.
Who is Responsible for Conducting Inspections?
In most construction settings, the responsibility for truck trip inspections falls on the shoulders of the safety officers and the workers who operate or oversee the vehicles. Safety officers are tasked with ensuring that all inspections are performed and documented according to the required standards, while the workers are responsible for actually conducting these inspections and reporting any issues.
Those carrying out the inspection are required to have certain qualifications, including:
- Training and/or experience as a mechanic or vehicle inspector
- Understanding of the inspection criteria and the tools used to perform the inspections
- The ability to identify defective components
Each member of the team plays a critical role in this process. Safety officers must provide the necessary tools and training, ensuring that inspections are thorough and accurate. Workers must diligently follow the inspection procedures and promptly report any concerns. When everyone understands their role and takes the inspection process seriously, the entire operation runs more smoothly, safely, and compliantly.
How Long Do Pre- and Post-Trip Inspections Take?
The duration of pre- and post-trip inspections can vary based on vehicle complexity and the thoroughness of the inspection process.
Pre-Trip Inspection: 15 to 30 minutes.
- For standard vehicles, a pre-trip inspection usually takes around 15 to 20 minutes. However, for more complex vehicles, such as those with specialized equipment, the inspection may take 30 to 50 minutes.
Post-Trip Inspection: 10 to 20 minutes.
- A post-trip inspection generally takes about 10 to 15 minutes for most vehicles. For larger or more complex setups, the inspection may extend to 20 minutes.
Both inspections are essential for maintaining vehicle safety and regulatory compliance, with the focus on conducting a thorough check rather than simply meeting a time limit.

Key Elements of a Pre-Trip Inspection
Before any vehicle hits the road, a thorough pre-trip inspection is critical. This inspection serves as the first line of defense against potential safety hazards and mechanical issues. By taking the time to carefully check each key component of the truck, you can help ensure that your vehicle is safe, compliant with regulations, and ready to perform its duties without interruption.
Highlights of a Pre-Trip Inspection Checklist
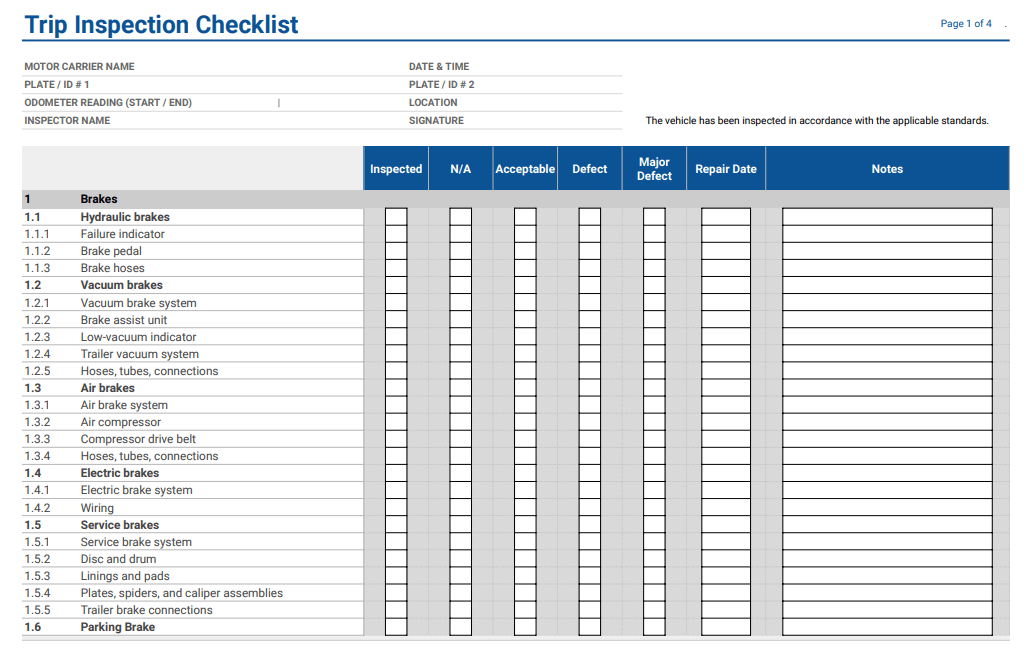
A comprehensive pre-trip inspection covers several critical areas of the vehicle, ensuring that every part is functioning correctly. While a detailed checklist is essential (and available for download ) , here are some key highlights to focus on:
General Information
- Plate or identification number(s) for the vehicle(s).
- Motor carrier’s name.
- Date and time of inspection, including where the inspection was performed.
- Odometer reading, if applicable.
- Signed statement by the person carrying out the inspection that the vehicle has been inspected in accordance with the standards.
Exterior Inspection
- Brakes: Test the brake system, including the service brake, air brakes, hydraulic brakes, etc. Make sure there are no audible air leaks (for air brake systems), and check that the brake pads are not excessively worn.
- Lights and Reflectors : Ensure that all lights (headlights, brake lights, turn signals) and reflectors are clean, properly aligned, and functioning. Faulty lights can lead to accidents, especially in low-visibility conditions.
- Tires and Wheels: Check the tire pressure, tread depth, and overall condition. Look for signs of wear, damage, or under-inflation. Also, inspect the wheels and rims for any cracks, bends, or other issues that could lead to a blowout.
Interior Inspection
- Steering and Horn: Test the steering wheel, horn, and other controls to ensure they are responsive and working as expected.
- Seat Belts: Inspect the seat belts for wear and tear, and ensure they buckle securely.
- Safety Equipment: Check that all required safety equipment is present and in good condition. This includes the fire extinguisher, emergency triangles, first aid kit, and any other equipment required by law or company policy.
Complex Systems
- Fuel System: Inspect the fuel tanks, lines, and caps for leaks, corrosion, or any signs of wear that could lead to fuel system failure.
- Suspension: Check the suspension system, including shocks, struts, leaf springs, and airbags, for damage or wear that could affect the vehicle’s stability and handling.
- Couplings and Hitches: For vehicles with trailers, inspect the couplings, hitches, and fifth wheel for secure attachment, proper lubrication, and any signs of damage or wear.
- Exhaust System: Examine the exhaust system, including pipes, mufflers, and catalytic converters, for leaks, rust, or damage that could impact vehicle emissions or driver safety.
- Electrical System: Inspect the battery, alternator, wiring, and connections to ensure that the electrical system is functioning correctly and that there are no exposed or damaged wires.
Download a Complete Pre-Trip Inspection Checklist
These are just a few of the essential areas to cover during a pre-trip inspection. To make sure you don’t miss anything, it’s crucial to use a detailed checklist. We’ve created comprehensive pre-trip inspection checklists that align with FMCSA and CCMTA standards, designed to help you streamline the inspection process and ensure full compliance.
This checklist is available for free download and will provide you with step-by-step guidance to keep your vehicles safe and road-ready. Download the Checklist Now .
Helpful Acronyms for Trip Inspections
To simplify trip inspections, several helpful acronyms can keep key checks top of mind.
- For anything mounted to the truck, remember PMS —everything should be Properly Mounted and Secure.
- When inspecting rubber components, use ABC to check for Abrasions, Bulges, or Cuts .
- For metal parts, think CBB —ensure they are not Cracked, Bent, or Broken.
5 Best Practices for Trip Inspections
- Training and Empowering Drivers:
- Provide comprehensive training to ensure all relevant staff are trained on how to perform detailed pre-trip and post-trip inspections correctly and understand the importance of these checks.
- Use Digital Tools for Inspections:
- Digital tools streamline the inspection process , enabling safety officers and drivers to complete and sign forms directly on their mobile devices. This reduces the risk of lost paperwork and ensures regulatory compliance. Digital platforms also allow for quick duplication of previous forms, saving time and maintaining consistency.
- Maintaining Compliance and Safety Records:
- Maintain detailed records of all inspections, including any issues found and actions taken. This documentation is invaluable for tracking maintenance needs and demonstrating compliance.
- Fostering a Safety-First Culture:
- Encourage a culture where safety is a priority by recognizing and rewarding thorough inspections and adherence to safety protocols.
- Consistency is Key:
- Perform inspections consistently, ideally at the same times each day, to develop a routine that becomes second nature for your team.
Top 10 Defects Found During Pre- and Post-Trip Inspections
Identifying and addressing common issues during pre- and post-trip inspections is crucial to maintaining vehicle safety and regulatory compliance. Below are the top 10 defects that safety officers and workers frequently encounter:
- Tire Underinflation:
- Low tire pressure is a frequent issue that can lead to tire failure, reduced fuel efficiency, and increased stopping distances. Regularly checking and maintaining proper tire pressure is essential for safe operation.
- Worn Tread on Tires:
- Tires with worn tread are more susceptible to skidding, hydroplaning, and blowouts, especially in wet or icy conditions. Monitoring tread depth and replacing tires as needed can prevent accidents.
- Faulty Brake Systems:
- Worn brake pads, low brake fluid levels, or air leaks in the brake system can significantly reduce braking performance. Ensuring brakes are in good condition before every trip is critical for safety.
- Non-Functioning Lights:
- Headlights, brake lights, turn signals, and other lights are vital for visibility and communication on the road. Regularly testing and replacing faulty bulbs prevents accidents and keeps vehicles compliant.
- Fluid Leaks (Oil, Coolant, Brake Fluid):
- Leaks from the engine, transmission, or brake system can lead to serious mechanical failures or fires. Inspecting the vehicle for fluid leaks and addressing them immediately is a key part of the inspection process.
- Battery Issues:
- A weak or corroded battery can cause starting problems and electrical failures. Checking battery health and cleaning terminals regularly ensures reliable vehicle operation.
- Suspension System Wear:
- Issues with the suspension system, such as worn-out shocks or broken leaf springs, can affect vehicle handling and stability. Regularly inspecting the suspension prevents these problems from worsening.
- Damaged or Missing Safety Equipment:
- Missing or damaged safety equipment like fire extinguishers, emergency triangles, and first aid kits can delay emergency response during a breakdown or accident. Ensure all safety equipment is present and in good condition.
- Cargo Securement Problems:
- Shifting or improperly secured cargo can lead to dangerous situations, including load spills or vehicle instability. Regularly check that all cargo is securely fastened before and after each trip.
- Undercarriage Damage:
- The undercarriage is often exposed to road debris, which can cause damage to the exhaust system, fuel lines, and other critical components. Inspecting the undercarriage for damage after each trip helps catch issues before they become serious.

Prevent Common Issues with Our Complete Inspection Checklist
Regular inspections can help prevent these common issues from becoming major problems. To ensure thorough and effective inspections, download our comprehensive Pre- and Post-Trip Inspection Checklist. It’s a free resource designed to help you cover all the necessary components and maintain safety and compliance. Download Here.
Fines for Violating Trip Inspection and DVIR Requirements
Fines can vary based on specific state/province regulations and the circumstances of the violation. However, here are some of the fines you could expect:
United States
Pre-Trip Inspection Violations: Range from $500 to $1,500 per instance. Repeated violations or severe safety issues can result in higher fines.
Driver Vehicle Inspection Report (DVIR) Violations: Range from $1,000 to $2,500 per violation. Penalties can be imposed for not documenting defects or not correcting them before operating the vehicle.
Pre- and Post-Trip Inspection Violations: Range from $500 to $1,000, depending on the province. The fine may be higher if safety issues are discovered during enforcement checks.
Driver Vehicle Inspection Report (DVIR) Violations: Range from $500 to $1,500. Penalties may increase if defects reported in the DVIR are not addressed, or if documentation is not maintained as required.
Pre- and post-trip inspections are vital practices that contribute significantly to the safety, efficiency, and longevity of your construction vehicles, including trucks, tractors, and trailers (intermodal equipment). By implementing thorough and consistent inspection routines with the help of technology, you can prevent accidents, reduce costs, and ensure compliance with regulations.
Make these inspections a non-negotiable part of your daily operations, and you’ll see the benefits in both your team’s performance and your bottom line.
Team Member
Pre-Trip Inspection Forms – Examples and Templates
- What are pre-trip inspections?
Pre-trip inspections are required for companies that operate and manage a fleet of vehicles used for commercial purposes. The basic goal of a pre-trip inspection is to identify and document any potential problems with a vehicle before a driver is on the road.
According to regulations set by DOT, vehicle operators must perform daily post-trip inspections after a vehicle is operated. If any defects or problems are found in the post-trip inspection, it must be included in the post-trip inspection report. The vehicle is allowed to be sent out for use again once all problems have been addressed.
- What information is checked in a DOT pre-trip inspection?
The Commercial Driver’s License (CDL) pre-trip inspection is designed to certify that the problems have been addressed and that the vehicle is ready to be safely operated on the road. While there are many different types of vehicles on the road today, the DOT provides a basic list or items to check when performing vehicle inspections:
- Service brakes, including trailer brake connections
- Parking (hand) brake
- Steering mechanism
- Lighting devices and reflectors
- Windshield wipers
- Rear-vision mirrors
- Coupling devices
- Wheels and rims
- Emergency equipment
(Source: FMCFA)
- Pre-Trip Inspection Checklist Forms and Apps
Inspection checklists are designed to improve the inspection process by providing staff with an easy-to-use template on the best practices to follow for that inspection.
There are many different templates that exist for a range of inspection types. For example, a class A pre-trip inspection template would look slightly different than what is required for a class B inspection template.
The most basic checklist can be completed on a sheet of paper, but more companies are turning to mobile apps and forms to streamline their processes for performing pre-trip inspections. Digitizing this information is highly beneficial for fleet management and transportation companies that need to document and report on their vehicle inspections.
Paper forms are simple to use, but missing or lost paper work can become a problem later on. To minimize risk and to modernize business operations, transportation companies rely on simple apps to digitize the information rather than using paper forms.
Beyond the basic benefits of digitizing the information, mobile apps also provide a number of advanced features that are helpful when performing inspections . For example, driver dispatch is an easy way to organize drivers and delivery schedules based on the most efficient configurations possible. Other features such as barcode scanning, signature capture, and GPS capture can help you keep track of your deliveries and maintain records for your business.
Mobile apps can be built using no-code or low-code solutions that do not require advanced technical knowledge. Using a simple interface, anyone can start building apps for their pre-trip inspection checklists to replace paper forms.
- Common Pre-Trip Inspection Examples and Templates
For businesses that want to modernize their processes using mobile apps, an important feature is going to be the ability to customize the mobile app to meet specific needs and requirements. Most mobile apps will provide templates to use as a starting point and then customizations can be made to require certain information.
With the GoCanvas app builder, businesses can create pre-trip inspection forms and checklists that are then deployed to workers to complete via the mobile app. All of this is suited for workers in different locations and standardized processes around how businesses collect and store their inspection reports.
Key outcomes include an increase in worker productivity, efficiency, and improved data collection for operations teams. Here are some of the common commercial vehicle inspection templates and examples:
Class A Vehicles
Class A vehicles are defined as “any combination of vehicles which has a gross combination weight rating or gross combination weight of 11,794 kilograms or more (26,001 pounds or more) whichever is greater, inclusive of a towed unit(s) with a gross vehicle weight rating or gross vehicle weight of more than 4,536 kilograms (10,000 pounds) whichever is greater.”
This would include tractor-trailers, combinations of truck and trailer, livestock carriers, tank vehicles, or flatbeds.
GoCanvas example and template:
- Pre/Post Trip Tractor Trailer Inspection
Class B Vehicles
Class B vehicles are defined as “any single vehicle which has a gross vehicle weight rating or gross vehicle weight of 11,794 or more kilograms (26,001 pounds or more), or any such vehicle towing a vehicle with a gross vehicle weight rating or gross vehicle weight that does not exceed 4,536 kilograms (10,000 pounds).”
This would include straight trucks, large passenger buses, segmented buses, box trucks, dump trucks with small trailers, and tractor-trailers.
GoCanvas examples and template:
- Bus Driver Daily Inspection App
- Truck Driver’s Pre-Trip Inspection
Class C Vehicles
Class C Vehicles are defined as “Any single vehicle, or combination of vehicles, that does not meet the definition of Class A or Class B, but is either designed to transport 16 or more passengers, including the driver, or is transporting material that has been designated as hazardous under 49 U.S.C. 5103 and is required to be placarded under subpart F of 49 CFR Part 172 or is transporting any quantity of a material listed as a select agent or toxin in 42 CFR Part 73.”
This would include small HazMat vehicles, passenger vans, combination vehicles not covered by Classes A or B.
GoCanvas example and template:
- Pre-Trip Fleet Vehicles Inspection Form
- Driving Tests
- Transform how your business operates with mobile apps
Many companies in the transportation industry start using mobile apps to solve a single paperwork challenge, like pre-trip inspections. But there are many areas of business operations that deal with paperwork that can create slow and manual processes for staff. This includes things like delivery confirmations, mileage tracking, safety inspections, bill of lading, and any other paper-based processes for drivers and management. If you are looking for additional transportation apps for business, be sure to search in the GoCanvas app store where you can get started for free.
Stay in Touch!
About gocanvas.
GoCanvas® is on a mission to simplify inspections and maximize compliance. Our intuitive platform takes care of the administrative tasks, freeing our customers to focus on what truly matters – safeguarding their people, protecting their equipment, and delivering exceptional quality to their customers.
Since 2008, thousands of companies have chosen GoCanvas as their go-to partner for seamless field operations.
Check out even more resources
Centurian transport saves $100k every year with gocanvas.
Centurion is the largest heavy haulage provider in Australia. They deliver national supply chain solutions to the resources, energy, construction & retail sectors…
Duotank Transforms Business Processes with GoCanvas
Duotank is a bag-in-tank alternative to the traditional keg beer system. The aseptic tank environment enables breweries to maintain the quality of their beer…
TWO MEN AND A TRUCK® used GoCanvas to increase data visibility & compliance
With a workforce that primarily works out in the field, many of the TWO MEN AND A TRUCK® locations found that paperwork was hindering…
Connect with an Expert Today.
We’ll help you put together the right solution for your needs..
CDL Pre-Trip Inspection Checklist
A thorough pre-trip inspection is a crucial part of a truck driver’s responsibilities. This inspection ensures the safety, functionality, and compliance of your vehicle before hitting the road. By systematically checking key components, you can identify potential issues, prevent accidents, and avoid costly breakdowns or violations.
This pre-trip inspection checklist is designed to guide you through the necessary steps to evaluate the condition of your vehicle. It covers all critical areas, including the engine compartment, brakes, tires, lights, and more. Regular adherence to this checklist not only keeps you and others safe but also helps maintain your vehicle in optimal condition, ensuring you remain in compliance with federal and state regulations.
Pre Trip Inspection Checklist
Download free and print it! Printable Pre Trip Inspection Checklist (PDF)
There are many sections to learn but the test is not as difficult as it may seem. Studying our simplified Class-A pre-trip inspection checklist and taking classes at your local CDL training school will get you prepared.
Engine Compartment
Driver door fuel area, coupling area, light check, in-cab inspection and brake tests, belt driven alternator, belt driven water pump, brake chamber, brake lining, caste nuts and cotter pins, coolant reservoir, gear box and hoses, gear driven air compressor, gear driven power steering pump.
- General Hoses
Leaf Springs
Power steering fluid reservoir, shock absorber, slack adjuster and push rod, spring hanger, steering column, what to check for:.
When checking the engine compartment, you will always want to make sure the following components are properly mounted and secured. You should also make sure they are not cracked, bent or broken. The items you will need to check for include:
- Make sure all of the wires are connected. The belt should not be cracked or frayed and the free play on the belt should be between ½ to ¾ of an inch.
- The free play on the belt should be between ½ to ¾ of an inch. Also check all the hoses running to and from the water pump to make sure nothing is leaking.
- The brake chamber should not be leaking air.
- The brake drum should be properly mounted and secure.
- The brake hose is rubber, so it is important to make sure it is not leaking air.
- Check for oil or debris on the lining. There should be at least ¼ of an inch of friction material.
- Make sure all three caste nuts and cotter pins are present.
- The reservoir should not leaking and must be filled to the manufacturer’s specifications.
- Make sure the drag link is properly mounted and secure, and not cracked, bent or broken.
- The gear box and hoses should have no abrasions, bulges or cuts, and should not be leaking.
- Although the air compressor is hard to see, you must make sure it is properly mounted and does not leak.
- The steering pump is located in the same place as the air compressor and is also gear driven. Ensure the steering pump is not leaking.
General Hoses (Passenger and Driver’s Side)
- The hoses should be secure at both ends. There should be no abrasions, bulges or cuts. Fluids run through these hoses, so it is important to make sure they are not leaking.
- The hub seal (or axle seal) should not be leaking and should be filled to the manufacturer’s specifications.
- Make sure none of the leaf springs have shifted.
- Check for leaks under the truck.
- There should be no lug nuts missing. Look for rust trails, powder residue and cracks around the bolt holes.
- The oil level should be filled to the manufacturer’s specifications.
- Make sure the pitman arm is properly mounted and secure. It should be not cracked, bent or broken.
- Make sure this reservoir is not leaking and filled to the manufacturer’s specifications.
- The rim cannot have any unauthorized welds.
- Make sure the shock absorber is not leaking. If it is leaking, the leak will be at the point where the top and bottom portion of the shock meet.
- With the brakes released and pulled by hand, the push rod should never move more than one inch.
- The spring hanger should be properly mounted and secure.
- Make sure the steering column is properly mounted and secure. It should not be cracked, bent or broken.
- Look for abrasions, bulges or cuts on the tread or sidewalls. Tread depth should have a depth no less than 4/32 of an inch. Tires must be properly filled to the manufacturer’s specifications. This can be checked with an air gauge.
- Make sure the tie rod is properly mounted and secure, not cracked, bent or broken.
- Make sure all are accounted for.
Back to top of Engine Compartment
Catwalk and Steps
Door and hinges, drive shaft, exhaust system, frame and cross members, spring mount.
Again it is important to make sure these items are properly mounted and secure. Look for cracks, bends, and breaks.
- The actual airbag is rubber, so it is important to check for abrasions, bulges, cuts and leaks, in addition to any missing mounting bolts.
- The axle seal should not be leaking and should be filled to the manufacturer’s specifications.
- Make sure to mention the brake chamber is not leaking air.
- Make sure the brake drum is secured properly. Also look for cracks, bends and breaks.
- Check the brake hose at both ends to make sure it is not leaking air.
- There should be no oil or debris on the brake lining. There should be at least ¼ of an inch of friction material.
- The cat walk and steps should be clear of any loose objects.
- Physically demonstrate that the doors open, close and latch properly. Door seals should not be worn, torn or rotten.
- The drive shaft should not be twisted and the u-joints should be free of any debris.
- The tread and sidewalls should have no abrasions, bulges or cuts. The tread depth should be no less than 2/32 of an inch. Tires should be properly filled to the manufacturer’s specifications. This can be checked with an air gauge.
- The exhaust system should show no signs of leaks.
- There should be no unauthorized holes or welds. Bundle up the cross members to ensure none are missing.
- Fuel should not be leaking from the tank and the cap should always be on tight.
- Rust trails could indicate loose bolts, while powder residue and racks around the bolts could mean the bolts have been over-tightened.
- Mirrors should be clean for best visibility.
- Make sure the mud flap is secured properly. Also look for cracks, bends and breaks.
- Make sure to mention there should be never be any unauthorized welds.
- The shock absorber should be secure at both ends and not leaking. If it does leak, it will leak in the middle.
- With the brakes released and pulled by hand, the push rod should not move more than one inch.
- If you are equipped with duals, check to see there is proper spacing between the tires and there is nothing stuck.
- The spring arm should be secure at both ends.
- The spring mount should be secure at both ends.
- Make sure the torque arm is secured properly. Also look for cracks, bends and breaks.
- Make sure to check and mention that no U-bolts are missing.
Back to top of Driver Door Fuel Area
Electric Line
Locking jaws, mounting bolts, release arm, sliding fifth wheel locking pin.
- Air lines should be secure at both ends with no abrasions, bulges or cuts. They should not be leaking, dragging or tangled.
- Make sure the apron is properly mounted and secure. Look for cracks, bends and breaks.
- Make sure there is enough space between the tractor mudflap and the trailer landing gear so that they don’t hit each other when making a turn.
- The electric line should be secure at both ends. There should be no abrasions, bulges, cuts or exposed wires.
- The gap is not an actual item, however there should be no space between the apron and the skid plate.
- The seals should be in good condition with no cracks, signs of rotting, or leaking air.
- Make sure the king pin is properly mounted and secure. Look for cracks, bends and breaks.
- You must physically check that the locking jaws is fully locked around the king pin.
- No mounting bolts should be missing.
- Make sure the platform is properly mounted and secure. Look for cracks, bends and breaks.
- The release arm should be in the fully locked position.
- The skid plate needs to be properly lubed.
- The pin must be in the fully locked position.
Back to top of Coupling Area
Header Board
Landing gear, rear door and hinges.
- Shock Absorbers
Tandem Frame and Release
Trailer tire.
- Again make sure the airbag has no abrasions, bulges, cuts or leakings. The airbag should not be missing any mounting bolts.
- The brake chamber should be properly mounted so that is does not leak air.
- The brake hose should be secure at both ends with no abrasions, bulges, cuts or leaks.
- Check for oil or debris on the brake lining. There should be at least ¼ of an inch of friction material.
- There cannot be any missing cross members.
- The header board cannot have any holes or missing rivets.
- The landing gear must be fully raised and the cradle handle secure.
- Rust trails indicate loose bolts. Powder residue and cracks around the bolt holes could be an indication of over-tightened bolts.
- The rims cannot have any unauthorized welds.
- The rear door should open, close and latch properly. Door seals should not be worn, torn or dry rotten.
- The shock absorber should be checked at both ends for leaks.
- When the brakes are released and pulled by hand, the push rod should not move more than one inch.
- Release handle and locking pins should be in the fully locked position.
There should be no abrasions, bulges or cuts to the tread or sidewalls. Tread depth should be no less than 2/32 of an inch. The tire should be properly filled to manufacturer’s specifications and checked with an air gauge.
- Front of the truck
- Both sides of the truck
- Rear of the truck
- Both sides of the trailer
- Rear of the trailer
Back to top of Trailer
The five functions are:
- Left turn signal
- Right turn signal
- Four way flashers
- High/low beams
- Brake lights
Back to top of Light Check
- Airbrake Test
Air Pressure Gauges
Emergency equipment, heater and defroster, lighting indicators, oil pressure gauge, parking brake, service brake check, water temperature gauge, windshield and mirrors, windshield wipers and washers.
The last section is In-Cab Inspection and Brake Tests. For the In-Cab Inspection you will once again want to make sure all of the following components are properly mounted and secure. As well as the following:
Air Brake Test
There are three stages to an air brake test:
- Applied Pressure Test – When doing the Applied Pressure Test, you will want to build the air pressure to governor cut out. Put the truck in the lowest gear, turn the engine off and immediately turn it back on. Push in the tractor and trailer valves which will then release the parking brakes. Push and hold the brake pedal, allowing the gauges to stabilize. When the gauges have stabilized, announce the Primary and Secondary PSI. Listen for air leaks while doing this.
- Warning Light and Buzzer – Pump down on the brake pedal until the warning light and buzzer comes on. This is typically at or before 60 PSI.
- Tractor/Trailer Protection Valve Pop Out – Pump down on the brake pedal until the tractor and trailer protection valves pop out, this will be between 20 and 40 PSI.
- The air pressure gauges should build to governor cut out.
- Your truck should have a fire extinguisher, three red reflective triangles and spare electrical fuses.
- Demonstrate both the heater and defroster are working properly.
Horns (Air Horn and City Horn)
- Blow both horns to make sure they are working.
- Check the left turn, right turn, four way flashers and high beams; also point these out on the dashboard.
- Make sure transmission is in neutral and then fully depress the clutch. Turn the key on, check the ABS light, announce when it comes on and off, and start the engine.
- The seat belt should not be ripped or frayed and should adjust and latch properly.
- The engine oil pressure gauge should rise to normal operating range.
- Trailer Parking Brakes – Set the trailer brake, release the tractor brake, then tug lightly on the trailer.
- Tractor Parking Brakes – Set the tractor brake, release the trailer brake and tug lightly on the trailer.
- Release both the tractor and trailer brakes. Drive at idle speed. Apply the service brake to make sure you come to a complete stop and that it doesn’t pull to the left or right when applying the brakes.
- The voltmeter should be charging between 13 and 14 volts.
- The water temperature gauge should also rise to normal operating range.
- The windshield and mirrors must be clean, with no obstructions and in proper adjustment.
- Demonstrate the wipers and washers are working properly by spraying the windshield.
Back to top of In-Cab Inspection and Brake Tests
During a CDL pre-trip inspection, truckers inspect many aspects of their commercial vehicle, including the overall safety of the vehicle; major hoses, fluid levels, and vehicle belts; the clutch or gear shift; and emergency equipment. The driver demonstrates their knowledge by walking around the vehicle, checking various safety components and explaining why each part should be checked for safety.

Reference and practice tests:
- Printable Pre Trip Inspection Checklist (PDF)
- CDL Practice Tests
Edited on 8/31/24
Pre- and Post-Trip Inspection Dos and Don’ts

Minimizing over-the-road breakdowns and preventing out-of-service violations are two of the many benefits of pre- and post-trip inspections. Use this list of dos and don'ts to complete your inspections the right way.
Don't: Think they're optional.
They're the law. Federal Motor Carrier Safety Administration (FMCSA) regulation 392.7 requires pre-trip inspections, while regulation 396.11 mandates post-trip inspections.
Do: Know what to check.
For a pre-trip inspection, check:
- parking brakes
- service brakes
- tires and rims
- steering system
- fluid levels
- belts and hoses
- electrical and air lines
- coupling devices
- air brake warning system
- emergency kit
- lights, reflectors and signals
- all applicable paperwork
Check the same items for post-trip inspections minus the fluid checks — don't touch anything that might be hot!
Don't: Kick-check the tires.
Thump checks don't work, because a tire sounds empty only if it's nearly 100% out of air. Use a calibrated tire gauge instead. Also, make sure all tires have the proper tread depth and that all lug nuts are tight.
Do: Double-check the brakes.
More than 1 out of every 4 vehicle out-of-service violations in the U.S. during the 2023 Commercial Vehicle Safety Alliance's (CVSA's) International Roadcheck were due to brake system violations.
Don't: Do an inspection differently each time.
Instead, develop a routine, and go in the same order with each pre- and post-trip check. Consider starting at the cab, then inside the cab, the front of the vehicle, then around the truck starting at the driver's side.
Do: Take your time.
There's no rush. Budget 10-15 minutes for a proper pre-trip inspection.
Don't: Forget the interior.
A clean cab tells an inspector that the rest of the vehicle is in good shape. A dirty cab says the opposite.
Do: Check your wheels.
It's the best way to make sure your truck doesn't accidentally move when you're doing a pre- or post-trip check. Forgetting to do so could cause a serious injury — or worse.
Do: Keep accurate logs.
Whether you use electronic or paper logs, keep them updated regularly, and make sure all other paperwork (driver's license, inspection, insurance) is current.
Don't: Ignore potential problems.
If you spot something out of the ordinary during your post-trip inspection, report it to dispatch immediately.
Download and share a PDF of this Safety Bulletin with your drivers.
English Español Français

At this time the Penske website requires that you enable JavaScript in order to take advantage of our website features. Please enable JavaScript and retry.
For assistance with other Penske services, please use the numbers below.
Truck Rental
- Household Rentals: 1-800-GO-PENSKE
- Business Rentals: 1-844-906-3404
Used Trucks
- 1-866-309-1962
Truck Leasing
- 1-888-234-4201
Penske Logistics
- 1-800-529-6531
- New Drivers - 1st License
- Defensive Driving
- CDL Practice Tests
- Air Brakes Courses—CDL & RV
- Log Books - US & Canada
- CDL Pre-Trip
- Learner's Permit
- Motorcycles
- Newly Licensed Driver
- Driving Test SHORTS
- Smarter Car Care
- SHORT Driving Tips
- Winter Driving
- Crash Analysis
- Air Brake Valves
- United States
- CDL Beginner
- CDL Turning
- CDL Pre Trip Inspection
- CDL Coupling
- Driving Instructors
- Pass CDL Air Brakes - Free
- Can't Log In
- Live Q & A
- Expert Witness
- The Founder
- 100K Campaign
- Smart Driver Success Stories
- Funny Driving Memes
Cannot find your purchased courses? Click here to Login!
- Commercial Drivers
- Pre Trip Inspection
Pre-trip inspections must be completed more often than every 24 hours.
How to Fill Out the CDL Pre-trip Inspection Form
https://youtu.be/SZ5K0G_dPnY
Introduction
All your training...all the manuals will tell you that you have to do a pre-trip inspection every day.
On a daily basis, you have to do a pre trip inspection.
That information is not entirely correct, and if you go on that information and you just do a pre-trip once a day , you're probably going to get a fine if you get pulled into the scale house.
So, we're going to tell you when you need to do a pre-trip and give you the specific information, so you don't get a fine you don't end up working the day for free.

When To To A Pre-Trip Inspection
Doing a pre-trip daily—doing a pre-trip inspection daily—is not accurate.
In terms of when you have to do a pre-trip inspection:
1) Minimum every 24 hours.
2) As well, anytime that you pick up new equipment you have to do a pre-trip inspection on that vehicle or that trailer.
3) The other time that you'll have to do a pre trip inspection as well, is if you're working with another driver keeping a unit going twenty four hours a day and you're working 12 and 12, or three drivers working 8-8 and 8.
You have to do a pre trip inspection on the piece of equipment that you're driving.
It is more relevant to semi trailer drivers because often you're picking up one, two, three, or four trailers in a day.
Every time you change trailers, you have to do a pre-trip inspection on that trailer.
Every time you pick up a new trailer , you have to do a pre-trip inspection.
Bus drivers the same, you get in a different unit you have to do a pre-trip inspection.
The other driver comes in, you're gonna do a pre-trip inspection because that driver was ten miles down the road and picked a nail up in one of the tires - the tire's flat.
Well...that driver is more interested in getting home than they are in doing a post trip inspection on that vehicle.
So you're going to have to do a quick walk around before you take off.
So the three times that you do a pre-trip inspection:
1) minimum 24 hours;
2) every time you get new equipment;
3) and when you're working the same piece of equipment with another driver.
Don't put your driver's license on a pre-trip inspection form or log book. If the thieves get hold of your license number it's very easy to steal your identity.
Pre-trip Inspection Forms
You have to fill out a pre-trip inspection form every time that you do a pre-trip inspection.
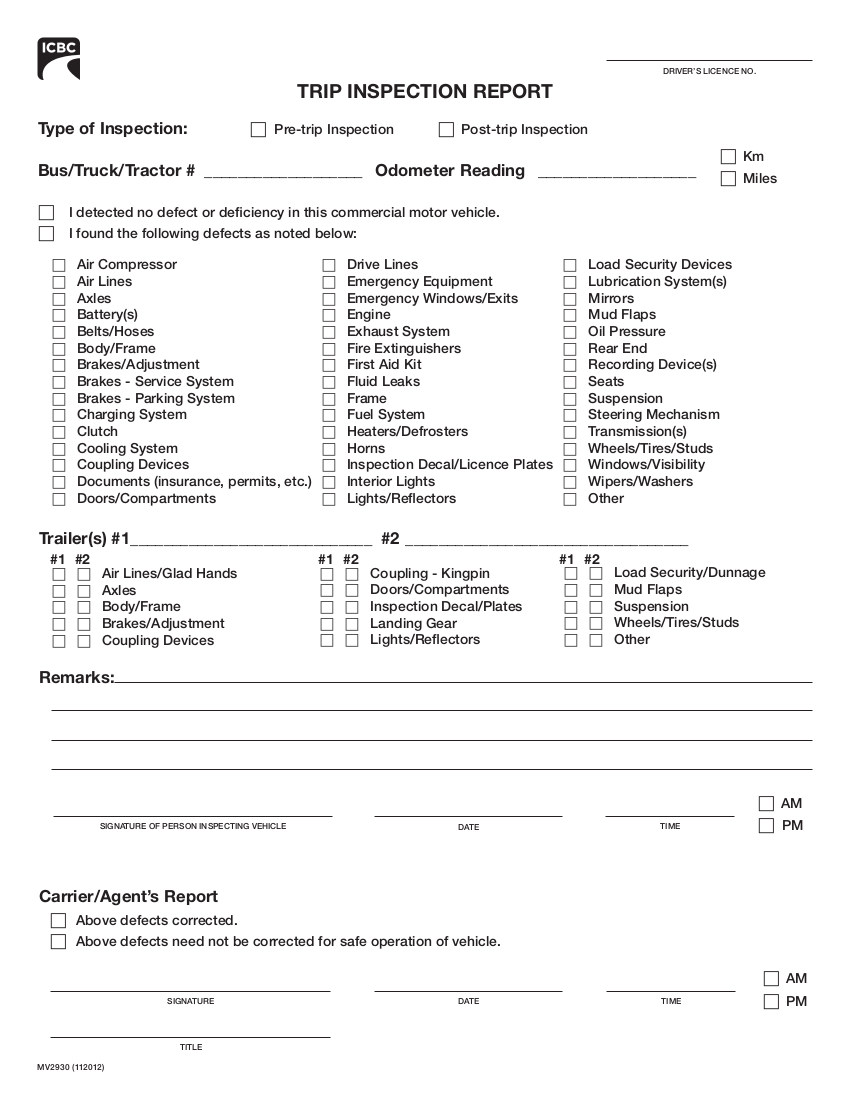
I'm gonna show you two pre-trip inspections today because one of the pre trip inspection forms is older and has a place on it for the driver's license.
And you can see that here.
Up here on the ICBC pre-trip inspection form that we use in British Columbia— ICBC as the Insurance Corporation of British Columbia.
Somehow an insurance company in British Columbia became responsible for driver licensing.
I don't know whether there is a conflict of interests there or not - maybe...maybe not?
The point is is that we no longer put driver license numbers on any of our legal documents - the log books or the pre-trip inspection forms because of freedom of information legislation and identity theft.

So don't put your driver's license number on; however, the unit number for the truck, the date, the time you started the pre-trip.
The reason that you put the time for the time that you start the pre trip is theoretically if you drive out of the yard and the DOT officer pulls you over right away and you put the end time on, well, they say:
"When did you do your pre-trip, if you're driving?"
So put the time that you started the pre-trip inspection on the form.
As well, am-pm.
There's two boxes - one box is:
1) "I detected no defects for the safe operation of this vehicle."
Check that box if you didn't find anything wrong.
If you did find something wrong:
2) "I found the following defects with this vehicle," check that box.
And then check the appropriate box in the list that you can see here behind me.
So, for example, if the fire extinguisher wasn't charged, you would check safety equipment and then write in the notes that the fire extinguisher isn't charged.

Now, you have to have a fire extinguisher in the vehicle as per the regulations; therefore, it's a major defect and you have to get it fixed before you go.
If you have a clearance light out, that's a minor defect and you can go without having it repaired.
So trailers, we have multiple places for more than one trailer, first-trailer, second-trailer, third-trailer, put that in.
If there's any defects with the trailer, check the appropriate box.
On the top of the ICBC form you can also see there's a starting odometer - starting odometer number goes in there as well.
Down on the bottom here of the ICBC form is where you sign, date, and put the time that you started your pre trip inspection.
The bottom of the ICBC form—down here, right at the bottom of the form—is for the carrier.
If you noted something was wrong with the vehicle that you're driving, the carrier signs off that they repaired it if in fact they did repair it.
So they - the bottom piece here is for the carrier, for the mechanic, or whomever is going to fix your vehicle, if you noted that there's something wrong.

Log Book Pre-Trip Form
Now, the other form that you see here is a more common form.
It's on the bottom of the log book sheet, and it has a space right about me here for post trip, pre trip, the date, the time, the location where you did your pre trip inspection.
So if you're running long haul, you're gonna have to put the location where you did it.
So, for example, if you're in Calgary, Alberta, you're gonna put Calgary, comma, AB.
AB is short form for Alberta.
If you're in Washington—Spokane, Washington—for example, you're gonna put:
Spokane, WA.

Now the other thing that's important to note on your pre trip inspection is that the location and the time match up with what's on your logbook - if you're keeping a log book.
Those two forms have to match up exactly.
If you get pulled into the weigh scale, pulled over by authorities, they're gonna look and they're gonna make sure that the time in your pre-trip inspection form and the time on your logbook match.
As well, on this form, you have the location for your home terminal up here in the corner.
Sign and date for the driver down in the bottom and I've talked about this in previous videos on log books .
Legal Document
The pre-trip inspection is a legal form.
If you have a crash and there's a legal investigation they're going to look at your pre-trip inspection forms and make sure that you did not detect any defects with that vehicle.
They're going to go back through the pre-trip inspection forms and make sure that the driver didn't note a defect on that vehicle for weeks at length of time and the carrier that you're working for didn't fix that.

Starting and ending odometer must match what's on your logbook.
So the two things that need to match in your logbook:
1) the location and the time;
2) and the starting and ending odometer.
Sign and date the document.
And then finally, on this log book here, you can see: "above defects need not be corrected for the safe operation of the vehicle."
Also, if something was fixed, you check the appropriate box, or something doesn't need to be fixed, but there was a defect noted.
As well, in this form here, you can see the unit number for the tractor.
So those are two different pre-trip inspection forms .
They're essentially the same information - little bit different.
The one on the bottom of the pre-trip inspection form [logbook] has a location.
It also has signature and date as they both do, but in different locations.

In conclusion, when do you do a pre trip inspection form:
2) every time you pick up new equipment;
3) if you're working the same piece of equipment with another driver.
Pre-trip inspection forms are essentially the same.
They all have the same information, the time that you start, check boxes for "defects need not be corrected for the safe operation of the vehicle."
Note whatever defects there are, check the box that defects noted - check the appropriate box if its lights.
Check the "light" box.

Make a note in the comment.
Sign, date - it is a legal document; starting & ending odometer, and the time on your pre- trip inspection form, and the location must match what's on your logbook.
On the note of post-inspections in British Columbia, the legislation states that you do not have to do a post trip inspection unless you noted some sort of defect or found a defect during the course of your day.
If you note a defect during the course of the day, you can put that information on the same pre-trip inspection form.
You don't have to fill out a new one.
If you did that, you need to do a post-trip inspection.

CLICK to Learn the Fundamentals of a CDL Pre-Trip Inspection
You can note the post-trip inspection on your pre-trip inspection form, but for the most part, it's not required by law in most jurisdictions; however, a lot of times a post-trip inspection can be company policy.
If it's company policy then you'll need to do a post-trip inspection.
And on most of these pre trip inspection forms, there is a spot for a post-trip inspection check box - you just check that.
Finally, if you get some of these old log book forms , there will be a place for your driver's license number.
You no longer have to put your driver's license number in because of freedom of information legislation and identity theft.

5 Things To Know Before Taking Your CDL Pre Trip Test

CDL Pre Trip Inspection Test Class A

5 Tips to Memorize the CDL Pre Trip Inspection

How To Remember Pre Trip Inspection CDL

CDL Pre Trip Inspection | The Work Pre-Trip

How to Read the CDL Motor Vehicle Inspection Decal

Tips for Avoiding Tire Violations | Roadcheck 2016

CDL Pre-Trip Inspection of Tires to Pass Test

CDL Pre-Trip Inspection Absolutes
© Smart Drive Test Inc. 2024.
Contact Us: [email protected]
Get Your DOT Inspection Checklist

- Register / Login
- Trucker's Forum
- Paid CDL Training
- Truck Driving Jobs
- CDL Practice Tests
- High Road Training
Pre-Trip Inspection Study Guide

Our Pre-Trip Inspection Study Guide has everything you need to prepare for the Class A CDL Pre-Trip Inspection Exam . Our study guide will cover the pre-trip inspection terminology as well as a thorough list of all of the parts you will be inspecting on the vehicle. For each part you will be inspecting there will also be a list of items you will be checking for. Our study guide is broken down into the following sections:
- What You Need to Know About Pre-Trip Inspection
Pre-Trip Inspection Practice Questions
- Pre-Trip Inspection Checklist
Pre-Trip Inspection Videos
Pre-trip inspection printable resources, what you need to know about the pre-trip inspection.
The Pre-Trip Inspection is a thorough inspection of the vehicle and all of its major systems. Inspecting the vehicle before driving each day is a Federal requirement and normally takes about 15 minutes. It must be logged in your logbook as "on duty not driving."
You will have to do thorough safety inspections of the coupling system, the vehicle lights, engine compartment, tires and brakes, the chassis, the fuel tanks, and an in-cab inspection.
The following information is a brief summary of Daniel's Complete Pre-Trip Inspection taken from our oustanding free PDF download:
Engine Compartment

You will be checking the engine compartment for any sort of leaks. You will also be checking to see if all components are properly mounted and secured. None of the mounts must be cracked, bent, or broken.
You will be checking all hoses to make sure they aren't leaking, frayed, or sliced and the fluid levels including the oil level, the coolant, and the power steering fluid.
You must check the components like the water pump, the power steering pump, and the alternator to make sure nothing is leaking, the belts are not frayed, and that everything is properly mounted and secured.
From inside the engine compartment you will also find the steering system, the front suspension system, and the front brake system. All components of these systems must be properly mounted and secured without anything being cracked, bent, or broken. Finally you will be checking the tires, rims, and axle seals to make sure the tires are properly inflated, the rim isn't bent or cracked, and the axle seals are not leaking.
Fuel Tank And Battery Area

You will be standing along the side of the tractor doing a series of checks on the mirrors, fuel tanks, batteries, exhaust system, and more. You will check to make sure nothing is bent, cracked, broken, or leaking.
Check the mirrors, door hinges, door handle to make sure nothing is cracked, bent, or broken. Check to make sure there is no fuel leaking and that the fuel cap is secured and the gasket is not missing.
Check the exhaust system to make sure nothing is cracked, bent, or broken. Check the driveshaft, cat walk, and steps to make sure nothing is cracked, bent, or broken.
Check the frame and crossmembers for structural integrity. Check the air lines going to the trailer to make sure they're properly connected and that there are no abrasions, bulges, or cuts. Make sure the gaskets are present.
Check the suspension system and brakes on the drive axles, making sure nothing is cracked, bent, or broken. Make sure the brake linings are the proper thickness and that the air bags and properly inflated. Inspect the brake chambers, slack adjusters, and pushrods are properly mounted and secure. Not Cracked, Bent, or Broken. With the brakes released and pulled by hand, the Push Rod should not move more than 1 inch.
Check the rims, tires, and axle seals of the drive tires for proper inflation, no leaks around the seal, and the lugs are all present and secured.
Coupling System

You will be standing where the tractor and trailer are connected and you'll start by checking the electrical line and air lines to make sure they're properly mounted and secure at both ends. No abrasions, bulges or cuts. Not leaking air. Make sure the electrical line has no wires exposed. Check the gladhands to make sure the seals are in good condition, no cracks or signs of dry rotting. Not leaking air.
Check the skid plate of the fifth wheel and the apron of the trailer to make sure there is no debris and nothing is cracked, bent, or broken. Make sure the fifth wheel is properly greased. Also make sure there is no gap in between the fifth wheel and the trailer apron once the tractor and trailer are coupled. Make sure the kingpin of the trailer is properly mounted and not cracked, bent, or broken and that the locking jaws of the fifth wheel are properly secured when the tractor and trailer are coupled.
Check the mounting bolts where the fifth wheel attaches to the tractor frame. Make sure there are no missing bolts and that everything is secured properly. Check the locking pin if you having a sliding fifth wheel to make sure it's properly locked into place.
Make sure that there is the proper clearance space between the tractor mudflap and the trailer landing gear so that they don’t hit each other when making a turn.

You will start inspecting the trailer at the head board, which is the front wall of the trailer. Make sure there are no holes or missing rivets. Check the landing gear to make sure it is properly mounted and secure. Not cracked, bent, or broken. Make sure the fully raised and the handle is secure in the cradle when the tractor and trailer are coupled.
Check the frame and crossmembers under the trailer to make sure they're not cracked, bent, or broken. Check the tandem frame and release pins to make sure the frame is in good condition and the release handle and locking pins are in the fully locked position.
You will check the entire suspension and brake system for the trailer tandems the same way you did for the drive axles of the tractor. You will also make sure the mudflaps are properly secured. For dual tires check to see that there is proper space between the tires and there is nothing stuck between the tires.
Check the rear door and hinges to make sure they are properly mounted and nothing is cracked, bent, or broken. Make sure the door seals are not worn, torn, or dry rotted.
Light Check

You will be checking all of the lights and reflectors on both the tractor and the trailer. Check the reflectors and reflective tape to make sure they are properly mounted and secure, not cracked, bent, or broken, and clean and illuminated. Check that you have the proper color of amber to the front and sides, and red to the rear.
Start by turning on your marker lights and headlights. Now walk around the entire truck and trailer and point out the lights. Give the function of the light and the location. You should then ask your examiner to help you check your five functions.
While you're sitting in the drivers seat, the examiner will stand to the front of the truck, then behind the trailer. He will then check your Turn Signals, Four Way Flashers and Brake Lights. You must do each function at every location.
The five locations that you must check your lights:
- Front of the Truck
- Both sides of the Truck
- Rear of the Truck
- Both sides of the Trailer
- Rear of the Trailer
The Five Functions you are checking for:
- Left Turn Signal
- Right Turn Signal
- Four Way Flashers
- High Beams/Low Beams
- Brake Lights
In-Cab Inspection

The in-cab inspection and air brake check will cover the various gauges and systems inside the cab along with several tests to make sure you air brake system is working properly.
You will start by checking the following:
- Seat Belt- Properly Mounted and Secure. Not ripped or frayed Adjusts and latches properly.
- Fire Extinguisher- Properly Mounted and Secure. Fully charged
- Three Red Reflective Triangles- My three red reflective triangles are GIVE LOCATION
- Spare Electrical Fuses- My spare electrical fuses are GIVE LOCATION
- Volmeter, Oil Pressure Gauge, Water Temperature Gauge, and Air Pressure Gauge all show proper operation
- City horn and air horn functioning properly
- The windshield and mirrors are clean, no cracks or breaks, no obstructions. The mirrors are in proper adjustment.
- Windshield Wipers and Washers - Demonstrate that the washers work by spraying the windshield. The Wipers are: Properly Mounted and Secure and operate smoothly. The blades aren't cracked or dry rotten.
- Heater and Defroster - Demonstrate that both the Heater and Defroster are working properly.
- Lighting Indicators - Left Turn, Right Turn, Four Way Flashers, and High Beams.
Trailer Parking Brakes - Set the Trailer Brake, release the tractor brake, and then tug lightly on the trailer.
Tractor Parking Brakes- Then set the Tractor Brake, release the trailer brake, and then tug lightly on the tractor.
Service Brake Check - Release both Tractor and Trailer Brakes. Now drive at idle speed. Apply the Service Brake to make sure you come to a complete stop, and that it doesn't pull to the left or right when applying the brakes.
Air Brake Test

The air brake test will consist of a leakdown test to make sure your air brakes aren't leaking air and losing pressure. It will also test the warning lights and buzzer to make sure the driver gets the proper warning if the air pressure drops too low.
There are three stages to an Air Brake Test
#1: Applied Pressure Test
#2: Warning Light and Buzzer
#3 Tractor/Trailer Protection Valve Pop Out
Applied Pressure Test: Build the air pressure to governor cut out. Put the truck in the lowest gear. Then turn off the engine Immediately turn the engine back on. Push in both the tractor and trailer valves. (This will release the parking brakes.) Push and hold the Brake pedal fully. Allow the gauges to stabilize. Announce the gauges have stabilized and the Primary and Secondary PSI. With the Brakes fully pressed, you should not lose more than 4 PSI in one minute. Announce that you are listening for air leaks during that minute.
Warning Light and Buzzer Test: Pump down on the Brake pedal until the warning light and buzzer comes on, at or before 60 PSI.
Tractor/Trailer Protection Valve Pop Out Test: Pump down on the brake pedal until both the tractor and trailer protection valves pop out. They should both pop out between 40 and 20 PSI.
We have a ton of Pre-Trip Inspection Practice Questions along with the answers and a complete scoring system in our Free Online CDL Practice Tests :
The Engine Compartment Section will include questions about checking the oil level and coolant levels, inspecting belt-driven engine components (like the water pump, alternator, and air compressor), and the safety devices required in the cab. There will also be questions regarding the windshield wipers and free play in the steering wheel.
The Lights And Brakes Section will include questions about dashboard indicator lights, inspecting the parking brakes, and doing a leakdown test on the air brakes. It will also include questions about the low air pressure warning signal and testing your air horn and city horn.
The Suspension And Steering Section will include questions about the tractor protection valve, inspecting the steering box, and inspecting many suspension system parts. It will also include questions about welds being present on tire rims and the minimum tread depth required on steering axle tires.
The Tires And Coupling Devices Section will include questions about shiny trails or rusty threads on lug nuts, inspecting the battery box and cover, and inspecting electrical lines. It will also contain questions about inspecting the coupling devices and the fifth wheel skid plate.
The Emergency Equipment And Fifth Wheel Section will include questions about additional emergeny equipment required by school buses, inspecting the gap between the kingpin apron and the fifth wheel skid plate, and the landing gear securement. It will also contain questions about inspecting driver mirrors and the trailer frame.
Pre-Trip Inspection Checklist - Class A
Our pre-trip inspection checklist covers every part of the truck from front to back, both inside and outside of the truck. It covers the air brakes, suspension parts, steering components, wheels and rims, fuel tanks, batteries, lights, and more. It also covers the air brake tug test and checks for everything under the hood including alternator, water pump, fuel pump, fluids, and more.
This is a super handy checklist to study anytime you have a few minutes to spare:
Pre-Trip Inspection Checklist - Free Word Document Download (Editable Version)
Pre-Trip Inspection Checklist - Free PDF Download (Print Version)
Pre-Trip Inspection Video By Apex CDL Institute
Jeff from Apex Institute does an in-depth explanation of the entire pre-trip inspection process. This video is loaded with tips that go beyond the CDL test to help drivers really understand how to identify problems.
Pretrip Inspection Self-Test By CDL College
The Pretrip Inspection Self-Test By CDL College is really unique. It's a silent video which will show you the part you're inspecting and then gives you a few seconds to figure out what you should be checking for before giving you the answer. Definitely check this one out. Great for practicing before the CDL exam.
Pre-Trip Inspection Video By Averitt Express
This is a complete back to front pre-trip inspection of a truck and trailer by Averitt mainentance associate Kevin Breeding. This thorough pre-trip inspection covers all inportant points of inside the cab, lights, engine, the tractor itself and the trailer.
We have included two print versions of the pre-trip inspection process from Daniel. The first is the entire pre-trip inspection and the second is an abbreviated checklist for the inspection.
- PDF: Daniel's Pre-trip Inspection (Print Version)
- PDF: Daniel's Pre-trip Inspection Checklist (Print Version)

Why Join Trucking Truth?

- The High Road Training Program
- The High Road Article Series
- The Friendliest Trucker's Forum Ever!
- Email Updates When New Articles Are Posted
Apply For Paid CDL Training Through TruckingTruth
Did you know you can fill out one quick form here on TruckingTruth and apply to several companies at once for paid CDL training? Seriously! The application only takes one minute. You will speak with recruiters today. There is no obligation whatsoever. Learn more and apply here:
- Privacy Policy

- Checklist Template
- Inspection Checklist Template
- Vehicle Inspection Checklist Template
Vehicle Inspection Checklist Template (Pre-Trip Inspection And Post-Trip Inspection)
ADVERTISEMENT

Related Articles
Related forms.

Related Categories
- Vehicle Inspection Form
- Car Inspection Form
- Daily Vehicle Inspection Sheet
- Vehicle Service Log
- Rental Inspection Checklist Template
- Truck Inspection Form
- Vehicle Inspection Report Template
- Vehicle Safety Inspection Form
- Vehicle Maintenance Checklist Template
Please, turn your attention
By pressing 'print' button you will print only current page. To print the document completely, please, download it.
Join 100,000+ Drivers
- Sponsorship
- Thinking of Becoming a Truck Driver?
- Getting a CDL License
- Trucking Driving Jobs Guide
- Trucking Company Guide
- Trucker Life
- Paid CDL Training
- CDL Schools
- Professional Driving Skills + Knowledge
- Owner Operator
- Latest Articles
- Truck Driver Skills
The Pre-Trip Inspection: A Practical Guide For the Truck Driver
Updated February 24th, 2022

- Facebook 426
- Pinterest 1
The pre-trip inspection is an integral part of every road trip for a trucker.
It’s probably the most disliked and most often overlooked part of the job of the professional truck driver in the trucking industry.
This inspection is meant to be a thorough check of the truck, trailer and load.
The check is to ensure that everything is in correct working order, prior to the truck and driver, departing on a trip.
Any damage or issues found during the pre-trip inspection which needs attention, must be addressed before departure.
CDL Test Pre-Trip Inspection
If you just came through the process of getting your CDL, you can breathe a sigh of relief.
You don’t have to check all 500 or so items that you had to memorize for the test every single day.
Out on the road, a thorough pre trip shouldn’t take more than 10 to 15 minutes.
DVIRs – Daily Vehicle Inspection Report
According to federal law ( FMCSR Section 396.11 ), every day, a driver must submit a Daily Vehicle Inspection Report (DVIR) for each power unit he operates. Multiple trailers can go in one report.
DVIRs are either paper or electronic.
Not every trucking company (ahem) enforces this policy, so some truck drivers can go months or years without submitting a DVIR.
Minimum DOT Pre-Trip Inspection Requirements
- Service brakes including trailer brake connections
- Parking brake
- Steering mechanism
- Lighting devices and reflectors
- Windshield wipers
- Rear vision mirrors
- Coupling devices
- Wheels and rims
- Emergency equipment
Your trucking company’s DVIR might be more thorough.
This is a thorough Q&A on DVIRs which you can refer to.

Inspecting a New Truck
When you are assigned a new truck (either daily or just once), there are a few additional things you need to check for on the pre-trip inspection.
Truck Compliance
- Cab card and book – This is a book containing the registration, inspection, permits, cab cards, IFTA paperwork, and any other important papers for the truck. Make sure it is in the truck and all the paperwork is up to date.
- Inspection sticker – This is outside the truck. Find it and make sure the truck is not overdue.
- IFTA stickers – These are the fuel tax compliance stickers. They are on both sides of the truck. Make sure the current year is displayed.
- Elog device – Most trucks are required to have a working elog device.
- Required permits – These are in the cab card book. The most common permits are Heavy Motor Vehicle Trip Permit (Oregon) and the Weight Distance Tax Permit (New Mexico).
- New York HUT sticker – This is usually on the front of your truck. It’s a type of permit.
- License plate – Make sure the license plates on the front and back of the truck match.
- FMCSA Safety Regulations and Hazardous Materials book – These will be given to you by your company. They must stay in your truck within arms reach from the driver’s seat.
- Paper logbook – If your e-log stops working, you must log your hours in a paper logbook, which must be kept in your truck.
- Medical card – You must keep your current medical card in your truck. Always have your CDL on you as well.
- Orange triangles – You must have 3 triangles for when you break down.
- Fire extinguisher – Must be charged and secured to the truck. No rolling around on the floor.
- Extra fuses – If your truck doesn’t use circuit breakers, you must have spare fuses.
- Load bars and/or straps
- Extra oil, coolant, and windshield washer fluid
- Line antifreeze and diesel anti-gel
- Chains and bungees
- Gladhand seals
- Hammer, wrench, wire cutters, cable cutters, knife with glass-breaker
The Class A Pre-Trip Inspection Process
Unless I have to bobtail to pick up my trailer, I inspect my truck and trailer together.
The best way to memorize a thorough pre trip is to do it the same way each time.
Your process will look different from mine, but as long as you are consistent, you will be less likely to miss anything.
I do the inspection first thing each morning as well as every time I swap trailers.
Paperwork and Trailer
- Check the paperwork. It should be the first thing checked when you get to your truck.
- Match the trailer number to your paperwork. If your trailer has a seal, make sure it matches too.
- Unsealed trailer. If your trailer does not have a seal, open it and confirm the product matches the bills. If you are picking up an empty trailer, open it and make sure it’s actually empty.
- Confirm your destination. Ensure the destination is the same as on your trip sheet or load assignment. If there is a discrepancy, call your dispatcher.

I personally like to start with checking under the hood of the rig. Not everyone does, but I do.
Under the Hood of the Truck
I walk around the front of the truck, making sure all the lights work. Then I open the hood.

- Fluid levels – Check all fluids: coolant, oil, power steering fluid, and windshield washer fluid. Make sure caps are tight for the rad, oil filler, power steering fluid and the dip-stick is seated properly.
- Alternator, water pump, power steering pump –Make sure these are in good working order, and the belts are not worn or have too much slack.
- Observe at the engine block. Check for leaks, fluid running down the side of the engine. Check for wear, cracking or fraying. Inspect fan belts for proper tension and signs of wear.
- Hoses – Check all hoses for leaks, cracks, and tears.
- Wiring – Check wiring for wear.
- Steering linkage – Check linkage for worn or missing parts.
- Tires – Tires should be properly inflated and have decent tread. If there are flat spots on the tire, it needs to be replaced.
- Hub seal – Make sure it’s not leaking and wiped with oil if transparent.
- Brakes – Brake chambers should not be out of round and should be free of grease. Shoes should not be worn down too much.
- Slack adjusters – Pull slack adjuster. If it travels more than an inch, it needs to be adjusted.
- Suspension – Shocks should be in good condition, and not covered in grease or oil.
Back of the Truck
Next, I check the back of my truck because it’s easier to check this before hooking to a trailer.
- Tires – Tires should be properly inflated and have decent tread. If the tires have flat spots, the tire needs to be replaced.
- Suspension – Shocks and airbags should be in good condition, and not covered in grease or oil.
- Drive shaft – Driveshaft should be undamaged and free of grease. Make sure there is no debris in the u-joints.
- Frame – The frame should not have any welds and not cracked or significantly rusted.
- Fifth wheel – The fifth wheel should be properly greased and not broken.
- Fuel tanks – Fuel tanks should not be leaking.
- Stairs and catwalk – Stairs and catwalk should be free of debris and not broken.

Tires should be checked with a tire gauge.
Tip . This is especially if you are slip seating. Tire thumpers aren’t very accurate. If you use a tire thumper, still check with a tire gauge from time to time.
Drives and tandems should be inflated to 100-110 psi and have a minimum tread or 2/32in. Steer tires should be inflated to 110-120 psi and have a minimum tread of 4/32in.
Tires under 50 psi should be replaced, as they can’t retain enough air pressure.
Flat spots can occur from dragging tandems in the winter or when trying to slide the tandems. Tires with flat spots should be replaced.
Check tires for damage, nails, and punctures.

Next, I jump in my cab and start my truck.
- Gauges – Make sure air, oil, and water temperature gauges rise to normal levels.
- Mirrors – Adjust mirrors before moving your truck.
- Windshield wipers – Make sure they work and sit flat against the windshield.
- Horn – Make sure the city and air horns both work.
- Heat and A/C – Check to see if heat and/or air conditioning is working.
- Seat belt – Seat belt should not be frayed and should move freely.
Coupling and Air Lines
This is what could happen if you don’t do the tug test.
The pre-trip inspection is a pretty important thing to do.
Learn your pre-trip procedure and do it when required.
This is why you should always do a tug test when picking up a trailer. The passenger side of the front of the trailer is resting on the frame of the truck and NOT hooked up to the 5th wheel.

The front left corner of the trailer is supported by retracted landing gear only. (Not good!)
The truck driver in this photo (hopefully) learned how critical a pre-trip is. Don’t end up in a pickle like this guy.
Next, I hook up to my trailer.
- Tug test – I back under my trailer until I hear a click, and then immediately do a tug test.
A tug test tests both your coupling and your brakes. If you pull away from your trailer, you aren’t hooked properly.
If you pull your trailer with you, your trailer brakes are out of adjustment. Be absolutely sure to write it up and have it corrected before departure.
- 4 Ways + Headlights. I also turn on my four-way flashers and headlights.
- Airlines and pigtails – Next, hook up airlines and pigtails (electrical connection). Inspect to make sure they aren’t leaking or ripped.
- Visual check of Fifth wheel – Look at the fifth wheel arm under the trailer to make sure it is coupled. The arm should be in.
- Landing gear – Raise the landing gear and check for damage.

Next, I check the bulkhead (front of the trailer).
- Wall – Make sure the wall is not damaged.
- Inspection sticker – Check the DOT inspection sticker to make sure it’s not out of date.
- Registration paperwork – Check the front trailer box to make sure the registration is good.
- Reefer unit – If you are pulling a reefer, select the pre trip function on the unit and run it. It should be completed by the time you are finished your pre trip inspection.
Next step for the pre-trip inspection is to check the side of the trailer and the tandems.
- Lights – Lights should be on and flashing.
- Suspension – springs or airbags should be in good condition, and not covered in oil or grease.
- Tandem pins – Tandem pins should be locked in position, and slider arm should be in its cradle.
- Cables – Make sure the tandem cables aren’t dragging on the ground.
- Underbelly – Make sure there are no damaged beams under the trailer. Check the entire length.
- Mudflaps – Mud flaps should not be torn and hanging.
Back of Trailer
Next, I check the back of the trailer.
- Doors – Doors and hinges should not be damaged.
- Door latches – Doors should be closed and secured.
- Seal – Seal should be intact and match paperwork.
- DOT bumper – DOT bumper should not be damaged
- License plate – Check for the license plate. They tend to wear out and fall off.
Passenger Side
Next, I check the passenger side.
- Brakes – Brake chambers should not be out of round and should be free of grease.
- Suspension – Springs or airbags should be in good condition, and not covered in grease or oil.
- Mudflaps – Mud flaps should not be torn.
Ready to Roll

Finally, I jump in my truck and double check my paperwork and destination.
I release my air brakes, roll forward, and push the service brake.
If everything is good, I’m ready to roll.
Post-Trip Inspection
When I’m done for the day, and every time I swap trailers, I do a post-trip inspection. If I am swapping trailers, I do a pre-trip on the new trailer as well.
A post-trip includes:
- lowering the landing gear
- removing the airlines
- uncoupling, and walking around the trailer checking tires, lights, seal, and mudflaps
Then I finish my paperwork and go home.
Slip Seating
If you slip seat (meaning you are in a different truck each shift), your pre- trip check should be more thorough than if you are permanently assigned a truck.
This also applies to the first inspection after being assigned a truck.
Please be courteous and write up any problems or issues found, so the next driver of the vehicle doesn’t have to deal with it.
Side Note: Clean out your truck and throw away any trash. Common courtesy goes a long way in trucking, between drivers.
Pre-Trip Inspection F.A.Q.
Most breakdowns can be avoided with proper preventative measures, such as daily inspections.
Thorough inspections should be done at the start of each shift. Inspections of trailers should be done every time you swap trailers.
Each driver should do a thorough pre-trip every time they swap drivers.
It should take about 10-15 minutes to perform a pre trip inspection.
The DOT. Make sure you stay in compliance so you don’t end up with hefty fines and an out of service.
The best way to memorize your pre trip inspection routine, is to do it the same way every time. That way you’re less likely to miss something. If you have questions, ask your safety team at your company.
Fluids in the engine, engine hoses and wires, brakes and suspension, mudflaps, trailer registration and inspection paperwork, and license plates.
A Few Trip Planning Tips

- Buy and learn to read a trucker’s atlas. It’s useful to plan routes and avoid restricted roads. I find this road atlas a necessity as a professional truck driver.
- Buy a decent trucking GPS , but don’t rely on it 100%. Use common sense.
- Don’t use the GPS in your elog device. It will put you in a lake.
Please note that minimum requirements for the inspection are established by the FMCSA.
But these may vary by state, trucking company, truck type, and trailer type.
It is your duty as a professional truck driver to perform a thorough pre-trip inspection before each trip and before you drive.
You’ll save yourself from headaches, fines and unnecessary accidents.

More Articles You May Like
- Trucking Terms – A Guide to Our Industry’s Lingo
- The 18 Wheeler – A Comprehensive Guide to Big Rigs
CDL Truck Driver Skills – Tips, Tricks + Knowledge to Kick Your CDL Skills Up a Notch!
- The D.O.T. Physical- A Guide For the Truck Driver

Everything You’ll Want To Know About Paid CDL Training

10 Clear Indications Truckers Are Not Welcome In Ontario

Trucker Tips Master Guide: Expert Advice From Experienced Truck Drivers
Twice a month we email you the best tips and new articles to help you better navigate the trucking industry..

10 Truck Driving Safety Tips Every Professional Driver Should Follow
A veteran 40+ years truck driver shares 10 of the all time, tried and true truck driving safety tips ALL professional truckers should know AND follow! If every driver of EVERY vehicle on the road followed these safety tips, our roads would be SO much safer.
A collection of trucker tips from million milers and experienced drivers. These are gold nuggets for the new truck drivers!

Instruction, clear advice, videos and photos for truck driver skills, maneuvers and information for all professional truck drivers.
A practical guide to paid CDL training programs. Recommended Company Sponsored Schools, Requirements, pros + cons, what to expect from company-sponsored cdl training programs.

The Cost of Naivety: A Lesson for All Truck Drivers
Zenon Bialkowski, a 70 year old, experienced Canadian truck driver, faced a nightmare when a routine job took an unexpected […]

Things You Won’t Learn in CDL School (+ What To Do About It)
So, you’ve finished your truck driver training. Your program was probably around 3-4 weeks, if you’re like most drivers (especially […]

How Witnessing a Fatal Accident Can Affect You: Forever
Truck driving can be a great career. But like any career, there are downsides and sometimes even a dark side. […]

10 Reasons Why Truck Drivers Quit Their Jobs
In the trucking industry, retaining drivers is a constant challenge for trucking companies. Understanding why truck drivers quit is essential […]

The Big Rush For More Truck Drivers To Put Behind the Wheel
It never ceases to amaze me how many regulations govern and control nearly every move we make as truck drivers. […]
Follow Smart Trucking
- Office Products
- Office & School Supplies
- Forms, Recordkeeping & Money Handling
- Legal Forms & Kits
Add to your order

- No Additional Cost: You pay nothing for repairs – parts, labor, and shipping included.
- Coverage: Plan starts on the date of purchase. Malfunctions covered after the manufacturer's warranty. Power surges covered from day one. Real experts are available 24/7 to help with set-up, connectivity issues, troubleshooting and much more.
- Easy Claims Process: File a claim anytime online or by phone. Most claims approved within minutes. We will send you an e-gift card for the purchase price of your covered product. In some instances, we will replace or repair it.
- Product Eligibility: Plan must be purchased with a product or within 30 days of the product purchase. Pre-existing conditions are not covered.
- Terms & Details: More information about this protection plan is available within the “Product guides and documents” section. Simply click “User Guide” for more info. Terms & Conditions will be available in Your Orders on Amazon. Asurion will also email your plan confirmation with Terms & Conditions to the address associated with your Amazon account within 24 hours of purchase.
- Buy a lot of stuff on Amazon? Tons of items eligible for coverage, from the latest tech like Laptops, Game Consoles, TVs, Phones, and Cameras to major appliances, sporting goods, tools, toys, personal care, furniture, and more.
- Accidents Happen. That’s why for your portable products we cover accidental damage from handling such as drops, spills and cracked screens. We also cover electrical and mechanical malfunctions, power surges, and wear and tear.
- Past and Future Purchases covered. 30 days after you are enrolled, all eligible past purchases (up to 1 year prior to enrollment) and future eligible purchases made on Amazon will be covered by your plan as long as you are enrolled.
- Fast, easy claims. Frustration-Free claims, with most filed in minutes. We will fix it, replace it, or reimburse you with an Amazon e-gift card for the purchase price of your product (excluding tax). File at Asurion.com/amazon.
- No Hidden Fees. For just $16.99 a month + tax you’re covered for up to $5,000 in claims per 12-month period. *THIS PROGRAM IS MONTH-TO-MONTH AND WILL CONTINUE UNTIL CANCELED* Coverage for all products ends 30 days after the plan is canceled. Cancel any time.
3 Year Office Equipment Protection Plan
4 year office equipment protection plan, asurion complete protect: one plan covers all eligible past and future purchases on amazon.

Image Unavailable

- To view this video download Flash Player
Detailed Driver's Vehicle Inspection Report (Pre- & Post-Trip) 5-pk. - Book Format, 2-Ply Carbonless, 5.5" x 8.5", 31 Sets of Forms Per DVIR Book - Meet FMCSR Requirements - J. J. Keller & Associates
( $6.41 / Item )
( $5.98 / Item )
( $5.73 / Count )
Purchase options and add-ons
- DVIR inspection book helps you comply with 49 CFR 396.11 and reduce the chance of fines.
- Driver vehicle inspection report books are used to document vehicle inspections for defects, which affect the safe operation of the vehicle.
- Truck inspection forms include check boxes for pre-trip and post-trip inspections.
- This vehicle inspection report book set comes with 5 books. Each book contains 31 sets of DVIR forms. In total, you will receive 155 forms.
- Vehicle inspection form measures 5.5" x 8.5", are 2-ply and carbonless.
Frequently bought together

Similar items that ship from close to you

From the brand

At J. J. Keller & Associates, Inc., we protect people and the businesses they run.

We help businesses succeed by safeguarding workers, removing risk, and providing peace of mind that complex government regulations are met. Choose from a variety of products, including labor law posters, SAFEGEAR Personal Protective Equipment (PPE), placards, forms, signs, handbooks, cargo securement, training and more, backed by our in-house product experts who ensure each item is compliant and meets our quality standards.

Protect your Business
Visit the Store
Product Description

Buy Forms with Confidence from J. J. Keller
An industry leader since 1953.
Keep your operation running smoothly – and ensure you’re in compliance with regulations and requirements – when you use J. J. Keller’s wide range of affordable safety and compliance forms.
A Family-Run Business
Our founder, Jack Keller, started J. J. Keller & Associates, Inc. in Neenah, Wisconsin, as a consulting firm to help trucking companies comply with complex regulations. That was 70 years ago. Today, President & CEO Rustin Keller is the third generation of the Keller family to lead the business, which has grown to support companies of all types and sizes.
Trust Our Wide Range of Experts
J. J. Keller’s team of regulatory experts continually monitors the requirements of 300+ North American agencies to ensure your forms meet all requirements.
Business leaders in transportation, manufacturing and industrial, healthcare, utilities, construction, education rely on J. J. Keller.
An Extensive Selection of Forms
- Annual Vehicle Inspection
- Drivers Inspection
- Driver qualification
- Forklift & Equipment Checklists
Looking for specific info?
Compare with similar items, product information, technical details, additional information, warranty & support, videos for this product.

Click to play video

Stay Compliant With The Detailed Driver's Vehicle Inspection Report
Testimonials by Jennifer

Driver's Vehicle Inspection Report
J. J. Keller & Associates, Inc
Customer reviews
- 5 star 4 star 3 star 2 star 1 star 5 star 80% 11% 6% 2% 1% 80%
- 5 star 4 star 3 star 2 star 1 star 4 star 80% 11% 6% 2% 1% 11%
- 5 star 4 star 3 star 2 star 1 star 3 star 80% 11% 6% 2% 1% 6%
- 5 star 4 star 3 star 2 star 1 star 2 star 80% 11% 6% 2% 1% 2%
- 5 star 4 star 3 star 2 star 1 star 1 star 80% 11% 6% 2% 1% 1%
Customer Reviews, including Product Star Ratings help customers to learn more about the product and decide whether it is the right product for them.
To calculate the overall star rating and percentage breakdown by star, we don’t use a simple average. Instead, our system considers things like how recent a review is and if the reviewer bought the item on Amazon. It also analyzed reviews to verify trustworthiness.
Customers say
Customers appreciate the functionality and value of the office product. They mention it works well and is a great product.
AI-generated from the text of customer reviews
Customers are satisfied with the functionality of the product. They mention it works well and is a great product.
"great price , great product ," Read more
" Handy good product ." Read more
" works well ..." Read more
Customers appreciate the value of the product. They mention it's a great price.
" great price , great product," Read more
"Easy to use and understandable and price is on point " Read more
"Same drivers report I’ve been using for yearsFast delivery , good value " Read more
- Sort reviews by Top reviews Most recent Top reviews
Top reviews from the United States
There was a problem filtering reviews right now. please try again later..

- Amazon Newsletter
- About Amazon
- Accessibility
- Sustainability
- Press Center
- Investor Relations
- Amazon Devices
- Amazon Science
- Sell on Amazon
- Sell apps on Amazon
- Supply to Amazon
- Protect & Build Your Brand
- Become an Affiliate
- Become a Delivery Driver
- Start a Package Delivery Business
- Advertise Your Products
- Self-Publish with Us
- Become an Amazon Hub Partner
- › See More Ways to Make Money
- Amazon Visa
- Amazon Store Card
- Amazon Secured Card
- Amazon Business Card
- Shop with Points
- Credit Card Marketplace
- Reload Your Balance
- Amazon Currency Converter
- Your Account
- Your Orders
- Shipping Rates & Policies
- Amazon Prime
- Returns & Replacements
- Manage Your Content and Devices
- Recalls and Product Safety Alerts
- Registry & Gift List
- Conditions of Use
- Privacy Notice
- Consumer Health Data Privacy Disclosure
- Your Ads Privacy Choices
An official website of the United States government Here's how you know
Official websites use .gov A .gov website belongs to an official government organization in the United States.
Secure .gov websites use HTTPS A lock ( Lock A locked padlock ) or https:// means you’ve safely connected to the .gov website. Share sensitive information only on official, secure websites.
Inspection, Repair, and Maintenance; Driver-Vehicle Inspection Report (DVIR)
IMAGES
VIDEO
COMMENTS
The Pre/Post-trip Vehicle Inspection Sheet is used to ensure that a vehicle is in good working condition before and after a trip. It helps identify any potential issues or maintenance needs that should be addressed to ensure safe and efficient travel. The pre/post-trip vehicle inspection sheet is typically filed by the driver of the vehicle.
The Pre-trip/Post-trip Vehicle Inspection Form is used to ensure that a vehicle is in proper working condition before and after a trip. It is designed to identify any potential issues or defects that could affect the vehicle's safety or performance. The pre-trip/post-trip vehicle inspection form is typically filed by the driver of the vehicle.
Pre-trip Inspection (396.13) Before operating the vehicle, the driver must inspect the vehicle and be satisfied that it is in safe operating condition. If the last vehicle inspection report notes any deficiencies, the driver must review and sign to acknowledge and certify that the required repairs were made. Periodic Inspection (396.17, 396.21)
Use this forklift truck pre inspection checklist to assess forklift drivers' competency on forklift operations and protocols. Perform thorough visual checks on vehicle parts and systems. Complete the audit by rating the overall performance "Safe or At Risk" and affix a digital signature to validate. Inspection template.
A driver pre/post trip inspection form is used by truck drivers to track the condition of their vehicles. A pre/post trip inspection form is used before and after long journeys. Use this free online form to keep your vehicles in top condition and ensure the safety of your passengers. Whether you're a truck driver or a business owner, Jotform ...
Download this free DVIR form to streamline and document your pre-trip and post-trip vehicle inspections. Simplify your inspection process by covering essential information on safety checks and proactive assessments by doing the following using this template: As the driver, fill in details about your company, the vehicle being inspected, and ...
For standard vehicles, a pre-trip inspection usually takes around 15 to 20 minutes. However, for more complex vehicles, such as those with specialized equipment, the inspection may take 30 to 50 minutes. Post-Trip Inspection: 10 to 20 minutes. A post-trip inspection generally takes about 10 to 15 minutes for most vehicles.
Pre-Trip Inspection Checklist Forms and Apps. Inspection checklists are designed to improve the inspection process by providing staff with an easy-to-use template on the best practices to follow for that inspection. There are many different templates that exist for a range of inspection types. For example, a class A pre-trip inspection template ...
Use to document vehicle inspections for defects that affect the safe operation of the vehicle. Includes check boxes for pre-trip and post-trip inspections. Book format, 31 sets of forms per book. Two plies. Carbonless. Measures 5-1/2" x 8-1/2". Personalized versionalso available.
The pre-trip inspection can identify vehicle defects prior to the movement of the vehicle for the safety of the driver and motorist. This will save the company $$$$$$$ Roadside repairs, towing, down time and costly fines from enforcement actions. Meet regulation requirements FMCSA- CFR49:396.11 and 396.13. Make sure the vehicle is safe to operate.
Download free and print it! Printable Pre Trip Inspection Checklist (PDF) There are many sections to learn but the test is not as difficult as it may seem. Studying our simplified Class-A pre-trip inspection checklist and taking classes at your local CDL training school will get you prepared. Engine Compartment. Driver Door Fuel Area.
Driver Pre-Trip/Post-Trip Inspection Checklist. This is a sample document only. Your organization is responsible for compliance with all applicable laws. Accordingly, this form should not be used or adopted by your organization without first being reviewed and approved by a licensed attorney in your
of pre- and post-trip inspections. Use this list of dos . and don'ts to complete your inspections the right way. Don't: Think they're optional. They're the law. Federal Motor Carrier Safety Administration (FMCSA) regulation 392.7 requires pre-trip inspections, while regulation 396.11 mandates post-trip inspections. Do: Know what to check.
A pre-trip truck inspection is a thorough check of the truck and its major systems to maintain safety on the road. Inspections need to occur before the start of a driver's shift and at least once every 24 hours while on the road. Truck pre-trip inspection needs to be performed by the driver while on duty, but before driving starts.
Don't: Ignore potential problems. If you spot something out of the ordinary during your post-trip inspection, report it to dispatch immediately. Minimizing breakdowns and preventing violations are two of the many benefits of pre- and post-trip inspections. Use this list of dos and don'ts to complete your inspections the right way.
Check the "light" box. When completing your pre-trip inspection, ensure that the Safety Inspection Decal is valid. Make a note in the comment. Sign, date - it is a legal document; starting & ending odometer, and the time on your pre- trip inspection form, and the location must match what's on your logbook.
Our Pre-Trip Inspection Study Guide has everything you need to prepare for the Class A CDL Pre-Trip Inspection Exam. Our study guide will cover the pre-trip inspection terminology as well as a thorough list of all of the parts you will be inspecting on the vehicle. For each part you will be inspecting there will also be a list of items you will ...
Are you properly documenting your post-trip inspections? According to 49 CFR §396.11, each commercial motor vehicle driver (whether passenger-carryingor property-carrying) must prepare and submit a report if a "defect or deficiency is discovered by or reported to the driver.". This means that if a driver operates three commercial motor ...
View, download and print Vehicle Inspection Checklist (pre-trip Inspection And Post-trip Inspection) pdf template or form online. 21 Vehicle Inspection Checklist Templates are collected for any of your needs.
Post-trip inspections. Post trip inspection may require documentation via a Driver's Vehicle Inspection Report (DVIR). A motor carrier can require that a driver fill out a DVIR at the end of each day if they wish; however, regulations were changed to require the driver to fill out a DVIR only if the vehicle had a defect or deficiency.
Out on the road, a thorough pre trip shouldn't take more than 10 to 15 minutes. DVIRs - Daily Vehicle Inspection Report. According to federal law (FMCSR Section 396.11 ), every day, a driver must submit a Daily Vehicle Inspection Report (DVIR) for each power unit he operates. Multiple trailers can go in one report.
Truck inspection forms include check boxes for pre-trip and post-trip inspections. This vehicle inspection report book set comes with 5 books. Each book contains 31 sets of DVIR forms. In total, you will receive 155 forms. Vehicle inspection form measures 5.5" x 8.5", are 2-ply and carbonless.
This rule also harmonizes the pre- and post-trip inspection lists. It responds in part to the President's January 2011 Regulatory Review and Reform initiative, removing a significant information collection burden without adversely impacting safety. The Agency also makes a technical change to section 396.11 to eliminate redundant language.